|
|
||||||||||
| This lab presents three different versions of a system, based on two microcomputers that exchange data through a parallel interface. Special attention is dedicated to a quantitative analysis of communication efficiency. The connections between the two systems is shown in the following figure:
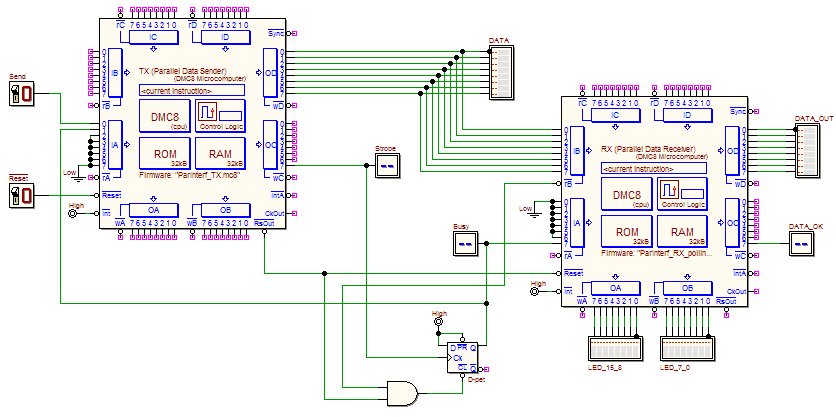
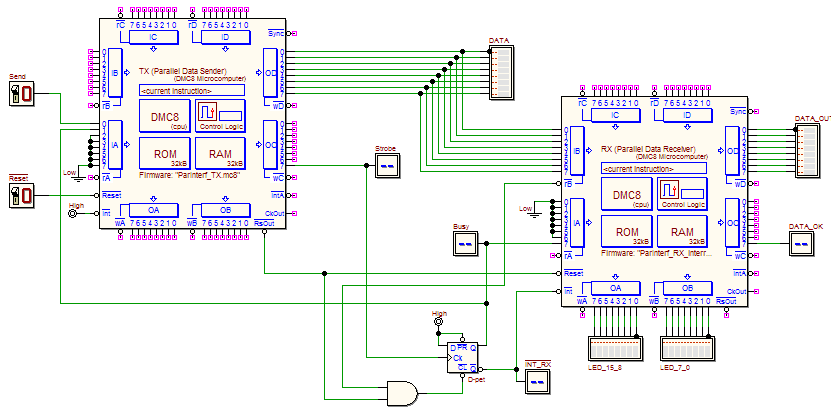
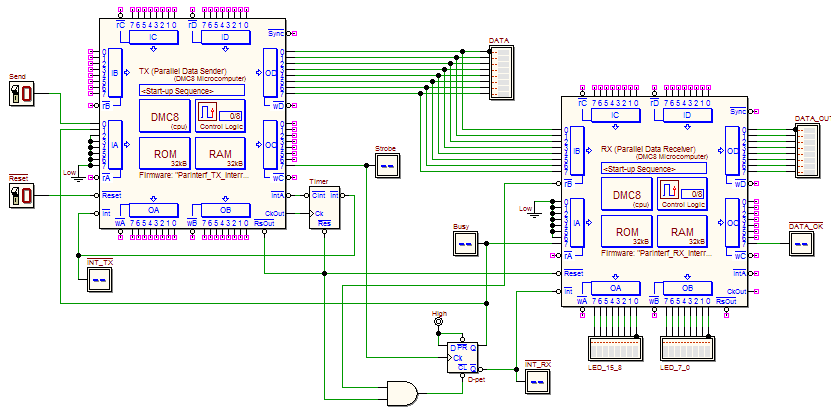
Microcomputer A sends parallel data to microcomputer B. The latter signals its availability to receive data, by setting at low level the Busy line: microcomputer A can therefore send a byte on the lines Data, informing the sender with a short pulse on the Strobe line. On the microcomputer B side, when Strobe arrives, the interface activates immediately the Busy signal, to stop microcomputer A from sending new data. After acquisition of the data, B resets Busy and by doing so enables A to send next data, if necessary. By analysing the different versions proposed, we will be able to evaluate pros and cons of polling and interrupt techniques. The first two exercises deal with the system analysis only, while the third one asks to adapt the microcomputer A control software on an interrupt base. 1) First version: polling based handshake In the first version (following figure), the data transmitter TX (Parallel Data Sender), on the left hand side, generates cyclically a value on the DATA lines, if the transmission enable command (SEND) is active. The interrupt line is not used. A value is sent only if the Busy line (bit 1 of port IA) is low. An analysis of the source code allows a better understanding of the operations of the transmitter. The Parallel Data Receiver RX, on the right hand side, is in charge of receiving the data and copying it on the lines DATA_OUT (output port OD), signaling the reception with a short pulse on output DATA_OK. Interaction between the two systems is helped by a D-Pet flip-flop that memorizes reception of the Strobe signal and, therefore warns of the presence of a new parallel data to acquire from DATA lines. The Busy line is generated by the same flip-flop. Microcomputer B is able to check, via polling, if a new data has arrived, by reading the flip-flop state on the line 7 of its port IA. An analysis of the source code allows a better understanding of the operations of the receiver. From the source code is clear that microcomputer B has another task, heavy and time consuming, the subprogram "SOMETASK", which is independent from the data communication system. Our purpose is to evaluate the efficiency of the communication interface, in different system versions, in spite of the necessity of executing SOMETASK. In the source code proposed here, for demonstration purposes only, SOMETASK cyclically rotates a lit LED on the 16-bits ports OA and OB. Let us assume that SOMETASK, in a real situation, can not be changed, and that it must necessarily be called in the main loop. Please note: SOMETASK will always be the same in all three system versions. You need to simulate the functionality of the entire system, in the d-DcS, by clicking on the previous figure, or by clicking here. The simulation can be performed either in interactive mode, or in timing mode (the "HandshakeTest" sequence is available). We recommend to activate, in the timing diagram, the "object code" windows of each microcomputer, to follow in detail the execution of the two programs. 2) Second version: interrupt based handshake on the receiver. In this second version of the system (see figure below), the transmitter data is identical (same hardware and software) to the previous case. The tasks required of the receiver are identical to the previous case, but with some important differences in their hardware and software implementation. As seen in the figure, the flip-flop D-Pet is now connected to the !INT (Interrupt) of the microcomputer B, too. The data receiver management software, instead of checking via polling whether or not new data has arrived, performs this check thanks to the mechanism of interrupts. The data reception and subsequent operations, in fact, are performed by the interrupt routine, which is called as a result of the request generated, by hardware, from the flip-flop. Note that this request is automatically deleted when the microprocessor reads the port IB. In fact, the read operation of IB, in addition to acquiring the data from the DATA lines, also produces a pulse on the line !RB that, as seen in the schematic, produces the reset of the flip-flop. You can load, in the d-McE, the source code of the receiver. Compare the behavior of the communication system with that of the previous one, evaluating its efficiency both qualitatively (for example, with the use of animation), and quantitatively. Using the timing simulation, in fact, it is possible to evaluate the actual data transmission rate, in terms of bytes per second, obtained by the two different systems. 3) Third version: interrupt based transmitter In the third and last version of the system (shown below), the receiver is identical to that of the previous case. Instead, a new element has been added to the transmitter: an Interrupt Timer that, connected to the !INT (Interrupt) of the microcomputer A, interrupts cyclically every 1000 clock cycles the processor (100 microseconds). The answer to the interrupt request, manifested by the microcomputer with the signal !INTA, automatically resets the interrupt request !INT, generated by the timer. The transmitter, in the previous versions, handled data transmission timing using a delay routine. Rewrite the transmission management software, using the technique of interrupts, completing the template downloadable here. With this technique it is possible to free up the main program from the task of transmitting the data (in fact, in the outline provided, the main program does not perform any task), allowing future extensions. In this case, the transmission speed can be varied by changing the time set in the Interrupt Timer component. | |||||||||||


